The Productive Potential of Agrivoltaic Roofs
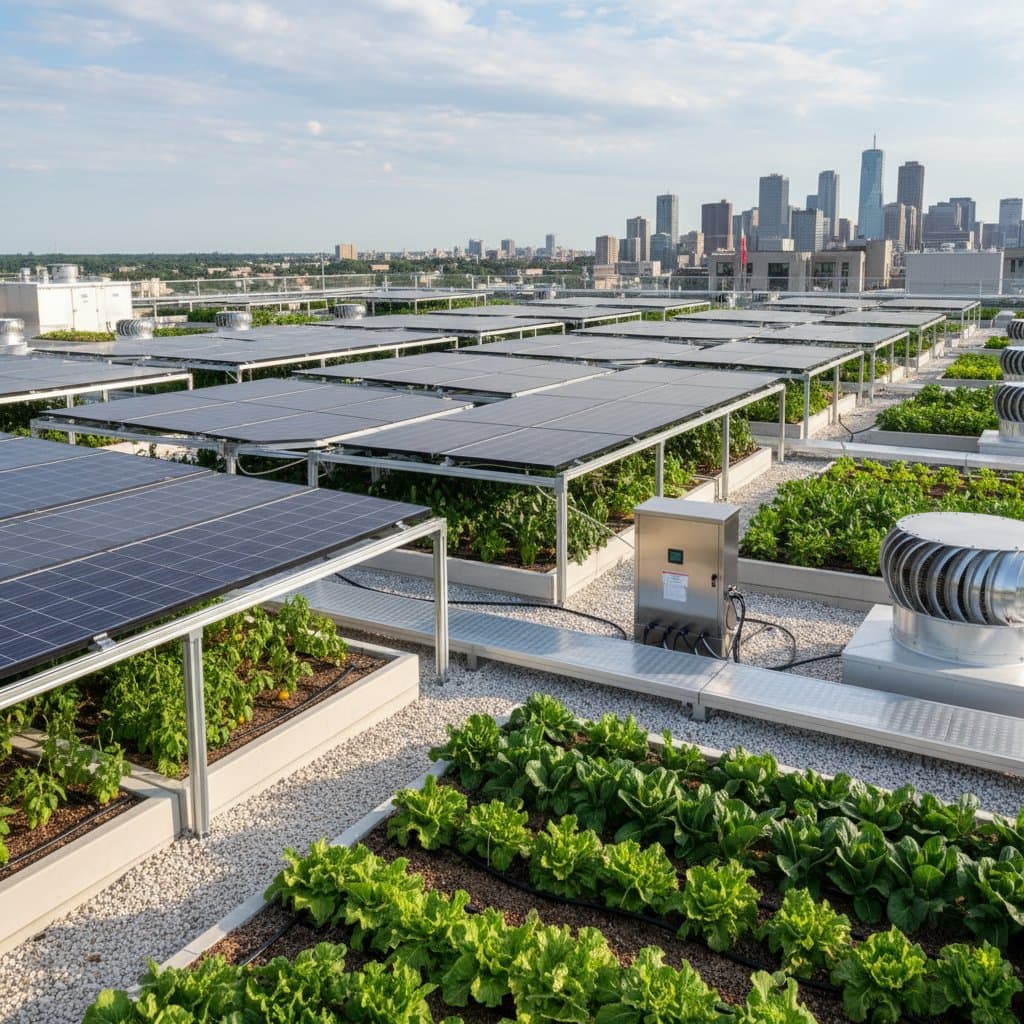
Homeowners frequently overlook rooftops as wasted space. These surfaces receive abundant sunlight each day, yet the heat builds up, driving up cooling bills. Agrivoltaic roofing redefines this potential by merging solar panels with rooftop gardens, yielding electricity, fresh crops, and reduced indoor temperatures.
This approach creates a dynamic, living system that advances environmental goals. Solar panels offer shade to protect plants from harsh rays, while the greenery below cools the panels for better energy output. Urban dwellers benefit from this efficient use of vertical space, addressing both energy demands and food scarcity.
Recognizing Opportunities in Urban Settings
In cities and suburbs, roofs capture intense heat, which elevates air conditioning needs and worsens urban heat islands. Ground-level space for gardening remains scarce, limiting local food production. While solar installations gain traction, conventional designs rarely incorporate vegetation.
Agrivoltaic systems position plants beneath photovoltaic arrays. Studies show that partial shading shields crops from excessive sun, promoting healthier growth. In turn, the evaporative cooling from plants maintains lower panel temperatures, boosting efficiency by several percentage points. This dual-purpose solution tackles energy and agriculture issues in tandem.
How Agrivoltaic Roofs Function
Agrivoltaic roofs combine solar technology with horticultural elements. Panels mount with intentional gaps to allow sunlight and airflow to reach the plants below. Raised beds or modular trays filled with nutrient-rich soil support crops such as leafy greens or berries.
Engineers design these systems to balance multiple factors, including shade patterns, moisture levels, and electrical generation. Key considerations include robust structural supports, effective waterproofing membranes, and automated irrigation networks. Such integration ensures the components work in harmony, minimizing wear and maximizing output over time.
Building Your Agrivoltaic Roof Garden: A Step-by-Step Guide
-
Assess Roof Capacity
Hire a structural engineer to evaluate the building's ability to support added weight from soil, planters, and water reserves. Reinforce beams or trusses as needed to distribute loads evenly and prevent sagging or failure. -
Optimize Panel Layout
Arrange solar arrays to expose 30 to 40 percent of the surface to indirect light, ideal for shade-loving plants. Install tiltable mounts that allow seasonal adjustments, ensuring year-round balance between power generation and photosynthesis. -
Select Resilient Crops
Opt for varieties that thrive in partial shade, including lettuce, kale, spinach, and strawberries. In regions with high humidity, choose adaptable herbs like basil or mint, which tolerate fluctuating water conditions without disease risks. -
Implement Smart Watering
Deploy drip irrigation lines linked to moisture sensors that deliver water only when soil dries to optimal levels. Integrate collection systems for rainwater or recycled graywater to reduce reliance on municipal supplies and enhance water efficiency. -
Monitor and Refine Performance
Install digital sensors to track solar yield, soil pH, and humidity in real time. Review data monthly to fine-tune irrigation schedules or panel angles, sustaining peak productivity across seasons.
Boosting Efficiency with Proven Techniques
-
Use Heat-Reflecting Materials: Choose light-colored underlayments or membranes that reflect sunlight away from the structure, keeping both panels and plants cooler during peak hours.
-
Embrace Modular Components: Employ prefabricated planting trays that facilitate quick swaps for crop rotation or seasonal changes, minimizing labor and structural stress.
-
Foster Biodiversity: Include nectar-rich flowers among edibles to attract bees and butterflies, supporting pollination and creating a mini-ecosystem on your roof.
-
Schedule Routine Care: Clean panel surfaces every three months to remove dust buildup, prune overgrown foliage promptly, and flush drainage lines seasonally to prevent clogs.
Balancing Investments and Returns
Initial setup costs typically fall between $25 and $40 per square foot, depending on system size, materials, and local labor rates. Homeowners see substantial offsets through electricity savings of up to 60 percent and indoor temperature reductions of 25 degrees Fahrenheit. Home-grown produce further cuts grocery expenses, often recovering the full investment in five to seven years.
Beyond finances, these roofs mitigate stormwater runoff, capture atmospheric carbon, and filter airborne pollutants. The plant layer shields the underlying roof from ultraviolet exposure, prolonging its durability by years. As sustainable systems expert Dr. Elena Ruiz observes, "When plants and solar panels share space, they create a climate buffer that benefits both technology and nature."
Addressing Permits and Standards
Review municipal building codes for requirements on solar arrays and rooftop vegetation. Some zones impose restrictions on height or weight, necessitating early approvals. For projects aiming at green certifications such as LEED, document metrics on energy savings and biodiversity from day one.
Agrivoltaic installations often earn points in categories like innovative design and habitat creation. Collaborate with licensed architects or installers to comply with safety norms and achieve verifiable results.
Launching Your Agrivoltaic Project
Start by consulting a specialist in green architecture to map out the project timeline, from site surveys to final planting. Prioritize equilibrium in light distribution, water management, and ongoing maintenance to secure long-term success.
This evolution turns your roof into a vital asset for energy independence and nourishment. It conserves precious resources while reinforcing your commitment to resilient, earth-friendly living.
Frequently Asked Questions
How much maintenance does an agrivoltaic roof require?
Monthly inspections of plant health and quarterly system reviews keep everything running smoothly. Clean solar panels three to four times annually, and check irrigation filters at the start of each season.